If you’ve managed to get this far then if your like me, you’ll be feeling pretty pleased with yourself! These DIY projects are good fun but in my experience working on a car is always a little more tricky than the internet lets on. Actually, it’s exactly the same for me with plumbing issues also! Even those small jobs that should be an easy quick fix or configuration swiftly mushroom into a whole heap of trouble. The time that a leaking tap in the bathroom decided to flood the place (just as I was working on fixing the leak!) being an absolute prime example! 😉
At this stage then you should have managed to install the camera and given it a quick test. Hopefully everything is working as it should be and your almost good to go. However, before your released onto the general public with your new system it’s a good idea to configure the camera properly.
[wpsm_video schema=”yes” title =”Garmin BC30 Camera – Installation” description =”How To Configure Your Camera – Part 4 of 6″]https://www.youtube.com/watch?v=4FPhZfIwYP0[/wpsm_video]
The video above brings you through the process of configuring your newly installed camera.
How do I configure the backup camera?
The easiest place to configure the device is in an empty parking lot. The furthest parking spots away from a shopping centre should also usually suffice – it’s also a good way of passing the time whilst your other half is in the mall;)
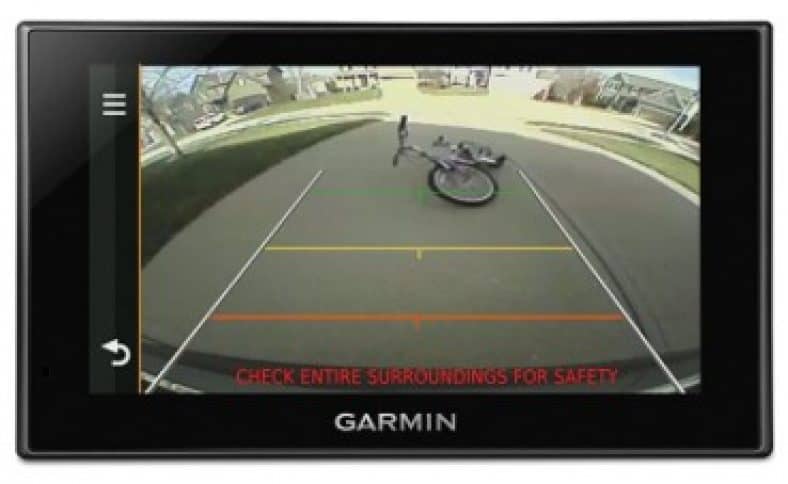
Position your car close to a parking spot making sure that the lines are visible on the screen of the sat nav. On your Garmin device select the following:
[wpsm_list type=”arrow”]
- Menu
- Guidance Lines
- Adjust Guidance Lines
[/wpsm_list]You will now be able to line up the guidance lines on the screen with those on the ground. Move the onscreen arrows up and down until they are aligned. The red line that you see on the screen should mark the back of your vehicle. This will then tell you when you are getting far too close to an obstruction. Once you have the configuration completed it’s a good idea to move the car to another spot. You should now check that the alignment has been done correctly and the device recognises your exact position in relation to the parking spots.
[affegg id=11country_code=!US]
[affegg id=8 country_code= !UK]
Setting Up Additional Cameras
Did you know that it’s possible to have up to 4 cameras paired to your device. This will provide you with better visibility around the vehicle. If you purchase the additional cameras separately then each camera will need to be paired individually. If on the other hand, you purchased the set as a whole then the cameras will already be paired. To be honest it’s not that much of a big deal to pair the cameras with your device as the procedure is fairly straightforward.
In order to pair a new camera with your device you should take the following steps. Turn on your Garmin sat nav device and choose the following options
[wpsm_list type=”arrow”]
- Settings
- Backup Camera
- Add New Camera
[/wpsm_list]Once you do this the screen will prompt you to ensure that there is no power going into the device. Place your vehicle in either neutral or park mode and then select “OK” on the screen. Now you can reintroduce the power and put the vehicle into reverse – please be careful of your surroundings! You should now see confirmation the screen that the new camera has been paired successfully with your device.
[wpsm_video schema=”yes” title =”Garmin BC 30 – Installation” description =”Additional cameras – Part 5 of 6″]https://www.youtube.com/watch?v=-jdO6cS5d9I[/wpsm_video]
And that’s it! You should now be good to go with your sat nav integrated new camera system. Easy? To be fair, it’s not too difficult of an installation but it can be rather fiddly yo complete.The most difficult part is the physical installation itself. To make it easier to instal please make sure that you spend the time thinking of the best location for the camera and the routes for the cabling. This will ensure that you don’t run into any problems in the future. If however, you do find yourself in some difficulty, the final Garmin BC 30 installation video is bellowed covers some the more common issues.
[wpsm_video schema=”yes” title =”Garmin BC 30 – Installation” description =”Troubleshooting Your Pairing Problems – Part 6 of 6″]https://www.youtube.com/watch?v=nu8NbKRq37w[/wpsm_video]
I hope you enjoyed this brief installation guide and found it useful. If you would like to read some more reviews and see the latest prices, then head over to Amazon using the link below.
[wpsm_button color=”orange” size=”big” link=”http://amzn.to/1NwMG02″ icon=”none”]Check Out The Garmin BC30 Camera At Amazon[/wpsm_button]